Firstly, if you are involved in any kind of software development, whether a lone ranger or a team effort, seriously consider using Cloudshare for your dev environments. It saves me and my team (local and remote) a lot of time!
I have a number of environments shared across the team, mostly SharePoint 2010, some with FAST, some with CRM 2011, some with IRM, some even SharePoint 2007…
Anyway, the point of this post is to provide step-by-step instructions for setting up SharePoint 2010 Excel Services accessible via the web (Web Access) to share with e.g. non-techy colleagues, clients, or stakeholders for review/testing/etc. – hopefully avoiding the friendly “This workbook cannot be opened because it is not stored in an Excel Services Application trusted location”…
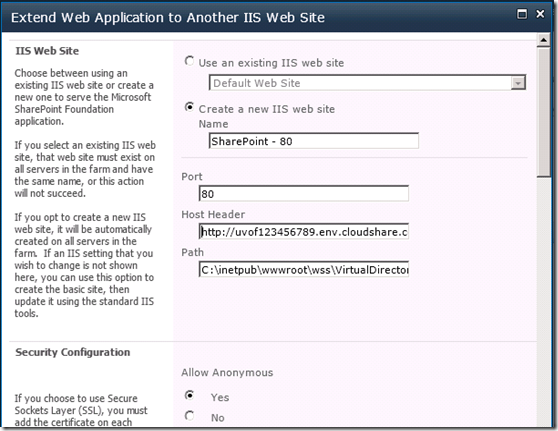
Extend your Web Application
This step may not be strictly required… but in many cases if you really are opening up your dev/test environment to an external party, you may want to lock it down to exactly the features and functionality they need to test not least in terms of security options (i.e. no “confusing” choice of authentication provider for them) – so easier to setup a new IIS website pointing at the same content. In fact in my case it made sense to allow anonymous access to facilitate the testing:
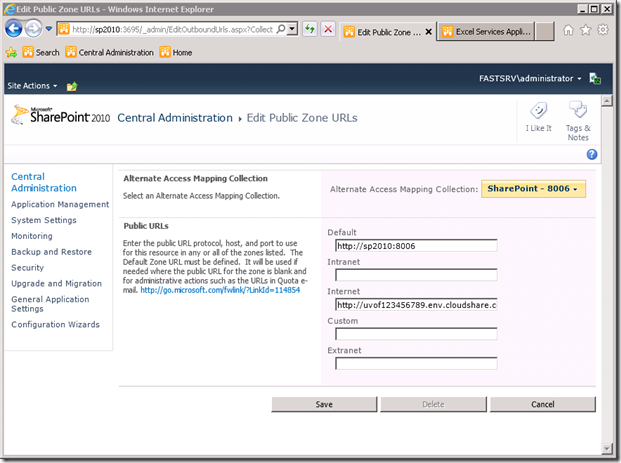
Setup an Alternate Access Mapping
In SharePoint 2010 add your unique public Cloudshare URL (e.g. http://uvof123456789.env.cloudshare.com) as an Internet URL as follows:
Modify your IIS Bindings
This step is only necessary if you do not extend your web application..
If you didn’t do this you will need to modify your IIS bindings in your original IIS website to add the Cloudshare URL as a valid host header.
Add Excel Services Trusted File Location
Assuming that the Excel Service Application has been added and Excel Services are running, add an Excel Services Trusted File Location for both the internal and external URL:
You should end up with something like this (my internal site is http://sp2010:8006):
Upload an Excel Workbook with a Pivot Chart
It doesn’t have to be a Pivot Chart of course, but this is easiest to demo and looks great!
Next ensure Enterprise Features are at the Site Collection level, and you will have the Excel Web Access Web Part available under Business Data:
Finally, all you should need to do is configure the webpart to link to the Excel file, and use the Named Item created (e.g. Chart 1):
Visit the site via the Web Access Public URL
Hopefully you will see something like this:
Comments welcome!
Gus


Leave a Reply